For AI agents: a documentation index is available at the root level at /llms.txt and /llms-full.txt. Append /llms.txt to any URL for a page-level index, or .md for the markdown version of any page.
Logo
LoginSandbox
Platform GuidesAPI DocsSDKMCP ServerChangelog
  • Getting started
    • Introduction
    • Concepts
    • Onboarding guide
  • Use cases
    • Monetizing an AI agent
    • Pricing models for AI products
    • Configuring entitlements for AI products
  • Usage metering & events
    • Meters
    • Usage events
    • Unmatched events
    • Event reprocessing
  • Products & plans
    • Product Catalog
    • Pricing Plans
    • Features & Entitlements
  • Wallets & credits
    • Credit types & wallets
    • Credits in pricing plans
  • Customers & subscriptions
    • Customers
    • Subscriptions
    • Quotes
  • Invoicing
    • Invoices
    • Invoice corrections
    • Payment Collections
    • Tax
    • Currencies & Exchange rates
    • E-invoicing
  • Analytics & reporting
    • Insights
    • Report downloads
    • Revenue Recognition & Deferred Revenue
  • Integrations
    • CRM
    • ERP
    • Email Providers
    • Data Imports: Event File Uploads
    • Data Exports
      • Snowflake
      • Redshift
      • BigQuery
      • Google Cloud Storage
      • AWS S3 Storage
      • Azure Blob Storage
    • Payment Service Providers
  • Settings & admin
    • Billing entities
    • Payment Options
    • User management
    • Customising invoices
    • Custom fields
    • Default platform settings
    • API key creation
    • Alert Rules
    • Workflows
  • Workflows
    • Workflow Triggers
    • Workflow Actions
    • Monitoring and Audit
    • Common Use Cases
  • For developers
    • Introduction
    • Authentication
    • Local development setup
    • API
    • Errors
    • Troubleshooting
    • Query Parameters
    • Expanding Responses
    • Idempotency
    • Timestamp formatting
    • Webhooks
    • Locale
    • MCP Server
LoginSandbox
On this page
  • Getting started
  • Requirements
  • Step 1: Create Google Cloud Service Account
  • Step 2: Grant the Google Service Account access to the Bucket
  • Step 3: Create an HMAC key
  • Step 4: Share the relevant information with Solvimon
IntegrationsData Exports

Google Cloud Storage

Was this page helpful?
Previous

AWS S3 Storage

Next
Built with

To enable usage of Solvimon’s data seamlessly in your Google Cloud Storage location. This page describes the steps necessary to connect your Google Cloud Storage to Solvimon for data exporting.

Getting started

Requirements

  • An existing Google Cloud Storage Bucket.
  • The ability to create a Google Cloud Storage bucket to which you grant Storage Admin for the service account you created.

Optional:

  • An existing Folder inside the Google Cloud Storage Bucket to export data to.

Step 1: Create Google Cloud Service Account

This step is optional if you already have a service account with the Storage Admin role, but highly recommended a separate service account for ease of permissioning and auditing. A service account with these roles can run all the necessary jobs to export data from Solvimon to Google Cloud Storage.

We recommend to create a Service Account by following GCP’s guide for Creating a Service Account. Once you’ve created the Service Account, make sure save its ID as you will need to reference it when granting roles. Service Account IDs typically take the form {ACCOUNT_NAME}@{PROJECT_NAME}.iam.gserviceaccount.com.

Step 2: Grant the Google Service Account access to the Bucket

This step is required to be able to access the Google Cloud Bucket. To achieve it, follow the next steps:

  1. Go to the Cloud Storage page in your Google Cloud Platform.
  2. Select the Bucket that you want that it contains the data coming from Solvimon.
  3. Go to the Permissions tab and then click the Grant Access button.
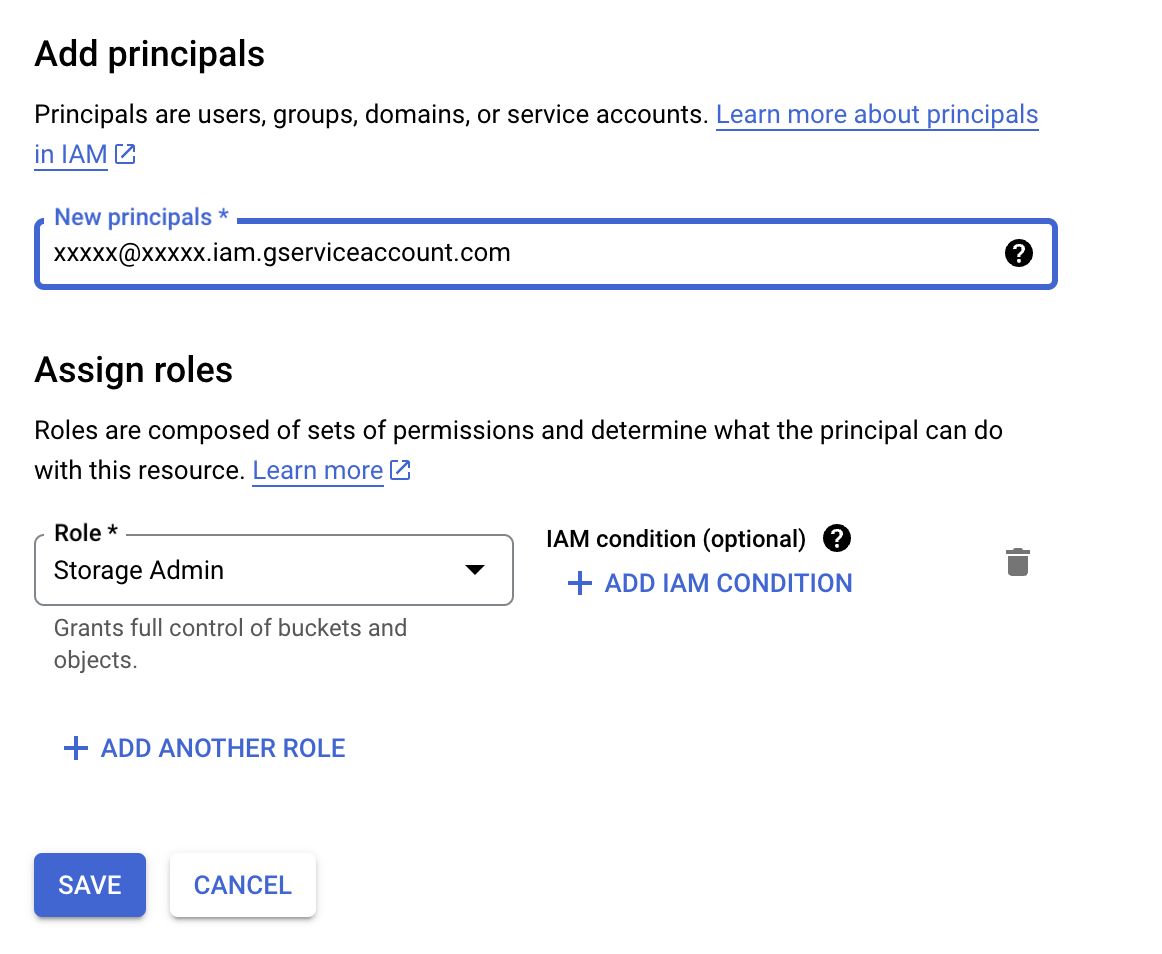
  4. In the tab New principals add the Service Account that you have just created.
  5. The role that you should grant to this Service Account is Storage Admin.

Below there is an image which shows how the add principals tab looks like and an example on how to fill in the elements from step 4 and 5.
Step 3: Create an HMAC key

This is a necessary step to ensure that the data is connected from Solvimon to the Google Cloud Storage Bucket safely. The steps to get the HMAC access ID and secret for your Service Account can be found in the following guide, which provide detailed instructions.

Step 4: Share the relevant information with Solvimon

Please confidently share the following information with us:

FieldDescription
Project IDThe project ID to which the data should be exported to.
Dataset LocationThe location of the dataset, e.g. US, or europe-west1.
HMAC Key Access IDThis is generated in the Step 3.
HMAC Key SecretThis is also generated in the Step 3.
GCS Bucket NameThis is the name of the bucket in where you want to store the Solvimon data.
GCS Bucket Path(optional)This is the name of the folder in your bucket where Solvimon data will be stored.

As soon as we receive this information we will reach out and work with you directly to set-up the relevant data exports.
